A Method for Instantaneous and Accurate Measurement of Surface Texture
The lay pattern of natural woodgrain or leather compared to that on the surface of metal, plastics, glass, stone, or other material is called surface texture. In addition to a high-grade feel and added value, surface texture is also added to improve durability and safety. It is used in a wide range of products including office equipment such as PCs and printers, automobile instrument panels, mobile phones, and home video game consoles.
Here we will explain the principles, key points, and other basics when it comes to texturing mold production. We will address common problems in their measurement and potential solutions to these problems.
- Surface Texture
- Principles of Surface Texturing Mold Production
- Key Points for Surface Texturing
- Problems in Conventional Surface Texture Measurements
- Solution to Problems in Surface Texture Measurement
- Summary: Dramatic Improvement and Higher Efficiency in Difficult Surface Texture Measurement
Surface Texture
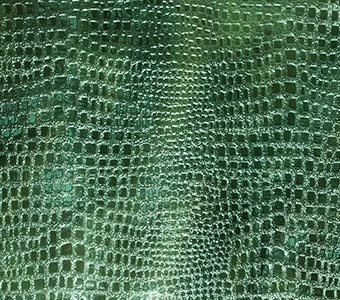
You likely have seen the words “surface texture” in the description of a leather surface. Surface texturing gives the surface of a product a natural wood grain, leather pattern, or matte pattern. It can extend the lifetime of the product, improve its appearance, and produce a high-grade feel.
The process of applying texture during production is called surface texturing. It is also called satin-finishing or etching. These textures can be created with molds (cavity or core) machined with the texture pattern on it, which is then transferred to the product surface during molding, chemical etching that uses chemicals to dissolve metal, and sandblasting.
Principles of Surface Texturing Mold Production
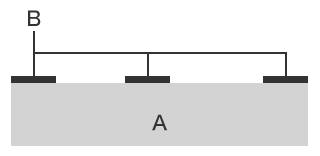
Surface texture is produced by transferring a machined pattern in the texturing mold to the product. For this reason, a texturing mold needs to be elaborately machined in order to reproduce a texture that has a three-dimensional feel as close to the real thing as possible. This is accomplished by repeating the processes of transferring and etching. The processing basics are the same no matter what pattern is being reproduced. This process is explained using the cross-section figures below.
-
First transfer
-
First etching
- A
- Mold
- B
- Acid-resistant ink
- C
- Metal at parts where acid-resistant ink is not applied are eroded and removed.
-
Second transfer
-
Second etching
- A
- Mold
- B
- Acid-resistant ink
- C
- The part removed at the first etching becomes even deeper.
- D
- Part removed at the second etching
-
Third transfer
-
Third etching
- A
- Mold
- B
- Acid-resistant ink
- C
- Part newly removed at the third etching
In this way, repeated transferring and etching creates a texturing mold with a highly expressive texture that creates a three-dimensional feel. The process may be performed once for a simple texture pattern, or it may be repeated ten times or more for a complex pattern.
In surface texturing, almost 80% of the entire process is manual work. Transferring in particular requires craftsman techniques and arduous work, and many man-hours are required.
Key Points for Surface Texturing
In most cases, surface texturing is performed after machining and polishing work are completed. Because of this, when correction is necessary or a defect that cannot be corrected occurs, it may have a serious adverse effect on the production schedule. For this reason, you can understand that surface texturing is a final process which entails very large risk.
The following are the key points that require attention in ordinary surface texturing in order to reduce the risk of defect occurrence.
Polish the mold surface with sandpaper or abrasive grains.
Completely remove micro cracks in the mold and machined layer of the surface.
Prevent defects caused by the mold material.
For the mold, select a steel material that has a low risk of material defects such as voids (bubbles), impurities, or carbides.
For heat treatment of the steel material, ensure that the cutting direction and rolling direction are the same whenever possible
If the directions are not the same, unevenness may occur and it may be impossible to produce a uniform texture. In addition, it is also important that texturing not be applied to locations where welding repair was performed.
Pay attention to the draft angle and thickness.
Set draft angles to be as large as possible. When the sides of the mold are processed, also increase the thickness of the molded product in order to deliberately increase shrinkage. Control the temperature of the mold surface when possible using a cooling structure and cartridge heater.
It may also be possible to improve quality by changing the process so that machining is performed after surface texturing. The final appearance of the surface texture changes visually according to factors such as the molding material type, coloring, and glass fiber content. For this reason, refer to past data and select the texture type, depth, and other characteristics accordingly.
Problems in Conventional Surface Texture Measurements
With surface texture, the depth, height, and pattern shape will have a large effect on the product quality. Surface texture defects affect more than just appearance and feel. In the case of surface texture for slip prevention, defects may affect safety and the overall grip of a part. In the case of texture intended to conceal surface flaws, defects may affect productivity. For this reason, measurement and inspection are necessary in order to confirm that the surface texture over the entire surface is as intended.
Conventionally, microscopes and roughness meters are used to perform texture measurement and quantification. However, these measurement methods involve some common problems.
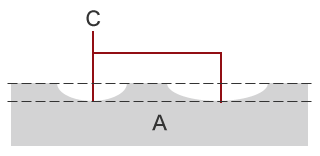
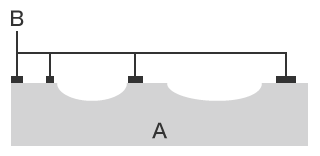
Problems in surface texture measurement using a roughness meter or displacement sensor
When measuring surface roughness using a roughness meter, measurement in the height direction is limited to points or lines only. As a result, it is necessary to increase the number of measurement points in order to accurately identify the shape. The time it takes to acquire measurements performed by moving a probe or stylus increases in proportion to the number of measurement locations. Furthermore, because positioning correction is required after the target is installed, the measured values lack reliability because the measurement points vary depending on the operator.

- A
- Probe
- B
- Detector
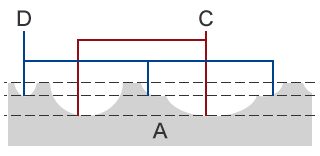
Problems in surface texture measurement using a microscope
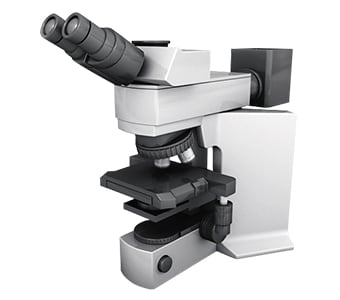
Unlike roughness meters, microscopes can capture “surface” information. Groove widths can be measured by determining the amount of stage movement, and depth can also be measured by determining the amount of focus change.
At the same time, measurements depend on the human eye, which results in variation due to differences in operator judgement. An additional concern is that microscopes are not originally intended for measurement. It may not be possible to quantify the measurement results, or the reliability of the quantified measurement values may be low.
Solution to Problems in Surface Texture Measurement
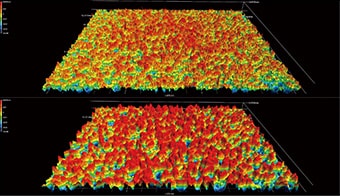
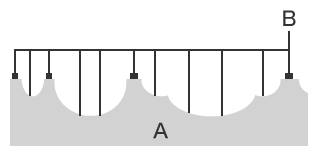
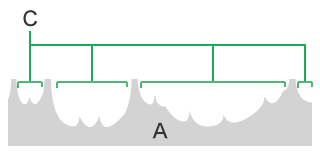
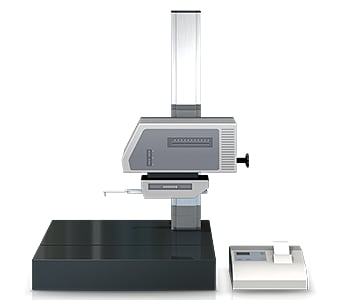
The measurement tools that are traditionally used to analyze surface texture encounter problems in the measurement of three-dimensional targets and areas. These measurements are performed by means of point or line contact resulting in low reliability. To resolve these measurement problems, KEYENCE has developed the VR Series 3D Optical Profilometer.
The VR Series accurately captures the 3D shape of the entire surface without contacting the target. It also measures the 3D shape by scanning the target on the stage in as little as one second with high accuracy. It is capable of instantaneous and quantitative measurement. This section introduces some specific advantages of the VR Series.
Advantage 1: Capable of measuring a wide area of up to 200 mm x 100 mm (7.87" × 3.94").
Measurement can be performed by placing the target on the stage and pressing a button. Strict positioning or other preparation is not necessary. This helps ensure that all operators, regardless of skill level, will be able to get accurate and repeatable results.
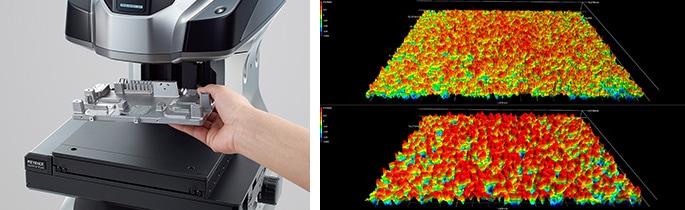
Unlike conventional measuring instruments, the VR Series is capable of easily measuring surface texture height parameters distributed over a wide area, something which previously required much time and effort to measure. Software tools that allow a variety of measurements to be easily performed are also included. This makes it possible for even an operator who is unfamiliar with measurement principles to easily and instantaneously perform analysis. This eliminates the need to assign a specialized operator to the tool.

Advantage 2: The measurement system supports traceability.
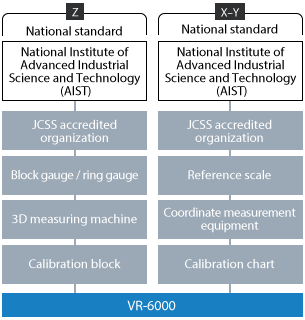
The VR Series is a non-contact coordinate measuring machine that ensures traceability to national standards. System performance is guaranteed for both accuracy and repeatability, producing highly reliable measurement results that you can trust. Calibration certificates come standard with the main unit and calibration board.
A calibration gauge that includes an inspection report and calibration certificate is also comes standard. The gauge is linked to the reference scale used by JCSS certification laboratories. As a result, any user can easily and accurately perform calibration on-site without the need to call a technician for assistance.
Summary: Dramatic Improvement and Higher Efficiency in Difficult Surface Texture Measurement
The VR Series can measure 3D target shapes accurately and instantaneously through fast and contactless scanning . Even difficult measurement such as height and roughness of surface texture can be completed in as little as one second. The VR Series can help solve the many problems conventional measurement tools run into.
- Because it measures the entire surface, the VR Series can easily measure surface texture over a wide area. It can also measure various parameters of roughness.
- This eliminates variation resulting from human factors, making true quantitative measurement possible.
- Without the need for positioning or other preparation, measurement can be performed simply by placing the target on the stage and pressing a button. This eliminates the need to assign a specialized operator for measurement work.
- 3D shapes can be measured easily at high speeds with high accuracy. This makes it possible to measure a large number of targets in a short time, helping to improve quality.
This system also allows for part-to-part and CAD-to-part comparison. Users can also perform easy data analysis and assign tolerances to get clear pass/fail results. It can be used effectively for a wide range of purposes including product development, manufacturing trend analysis, and sampling inspections.
