Atomic force microscopes (AFM)

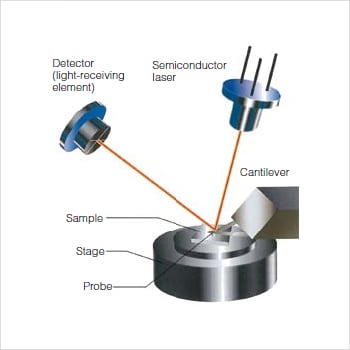
The atomic force microscope (AFM) measures the asperity of a sample using the atomic forces between the tip and the sample. To perform measurements, the user moves the cantilever, equipped with a sharp tip (probe) at its end, into proximity of a sample surface to a distance of several nanometers. In order to maintain a constant force between the tip and the sample (a constant deflection of the cantilever), the AFM gives feedback to the piezo scanner while scanning. The displacement provided as feedback to the piezo scanner is measured to obtain the z-axial displacement, which represents the surface structure.
A common way of measuring the displacement of the piezo scanner is the adoption of the optical lever method, in which a laser beam is emitted on the back side of the cantilever and the reflected beam is detected by two- or four-segment photodiodes.
| Advantages | Disadvantages |
|---|---|
|
|
Very small measurable range
An atomic force microscope (AFM) is a magnifying observation tool capable of measuring 3D textures of a minuscule area. Unlike scanning electron microscopes, it can acquire height data in numeric values, which enable quantification of sample and data post-processing. The AFM also allows for measurements in normal atmosphereic conditions and is free from restrcitions such as the need for sample pretreatment and electrical conductivity. On the other hand, however, it is subject to the limitation of a narrow measuring range (XYZ) due to its high-resolution capabilities. AFMs are also often unable to accurately position its probe to the measurement area and requires the need for knowledgable operation (proper mounting of the cantilever, etc.)

