KV-X Series × VS Series
EtherNet/IP™ Connection Guide
Return to KV Series Connection Guide
Contents
Step 1 : Check device required for connection


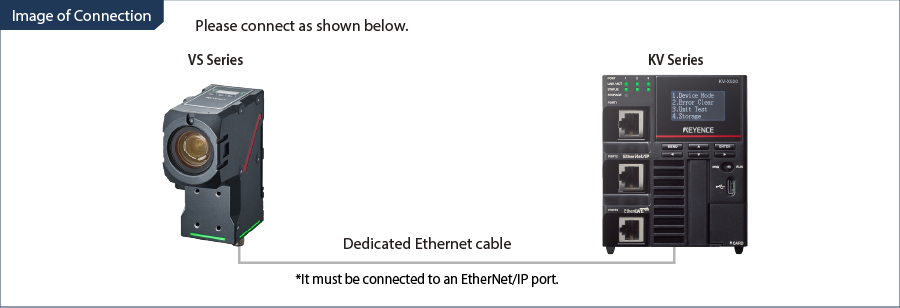
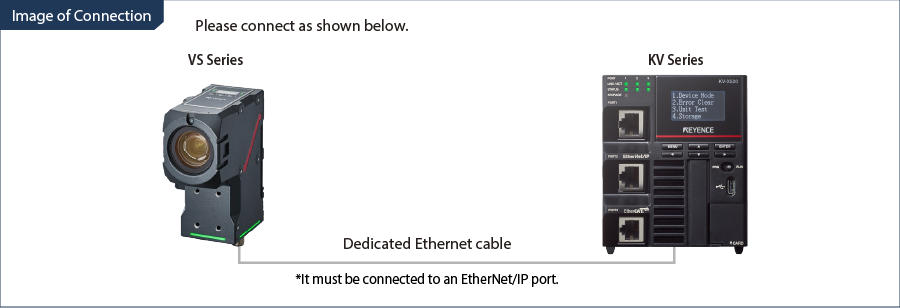
-
*Requires separate power supply.
Step 2 : VS Series EtherNet/IP Settings
This part explains how to do the settings for the VS Series.
Before doing the network settings, determine the following items in advance.
- - IP address to be allocated to the KV Series (Ex: 192.168.0.30) * Initial Value: 192.168.0.10
- - IP address to be allocated to the VS Series (Ex: 192.168.0.10 (Initial Value))
1. Start VS Creator (software for the VS Series), and check that a VS Series device is displayed in the “Connect to Device” screen.
-
*The computer and the target VS Series device may need to be connected to the same network address group.
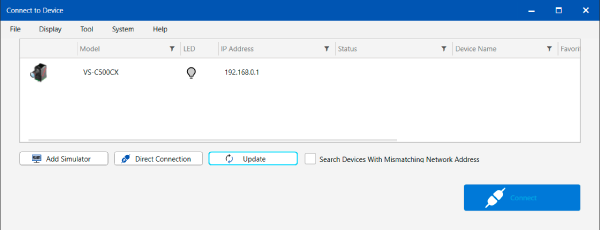
2. Select a row from the device list. This displays  next to the IP address.
Click the icon to display the [Network Settings] dialog. This allows you to change the Network Settings of the device that you selected in the list. After you have finished changing the settings, select [Connect].
In this case, make the following settings.

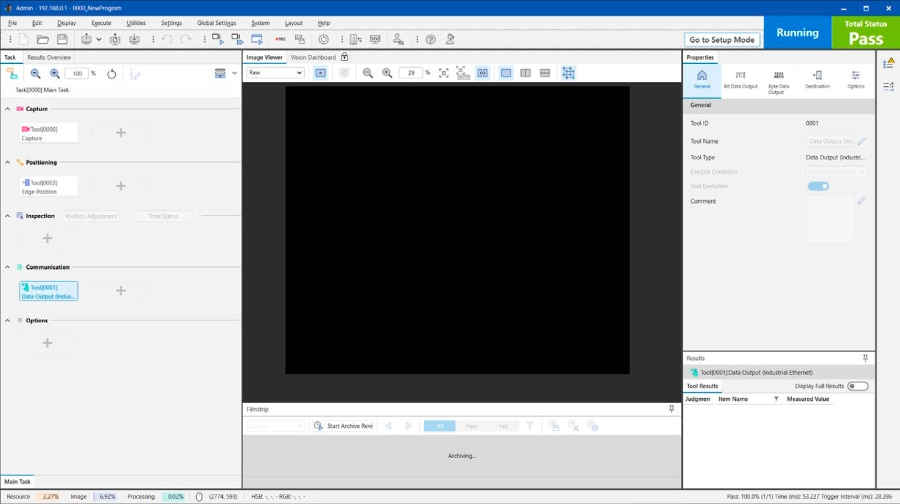
3. The “Main Screen” appears.
4. Select [Industrial Ethernet Settings] in [Global Settings].
-
*You can only make these changes in Setup Mode.
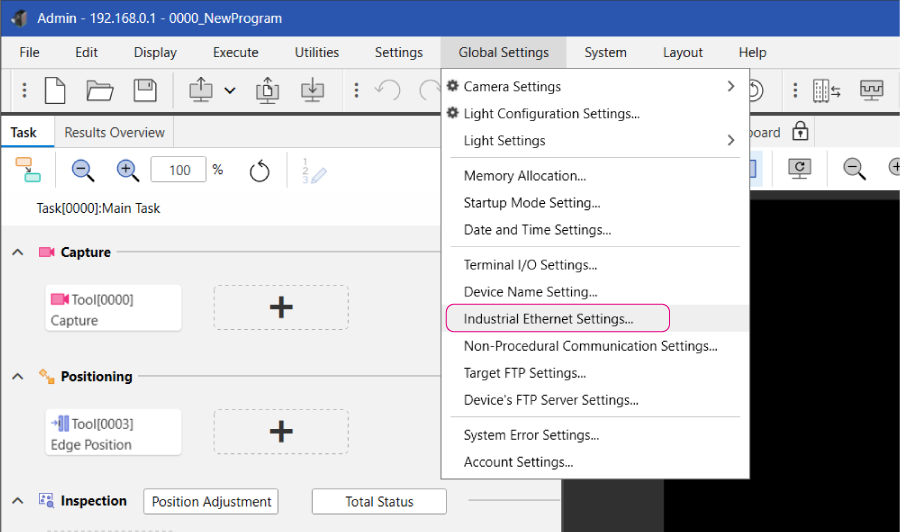
In the “EtherNet/IP” screen of the “Industrial Ethernet Settings” dialog, match the following settings.
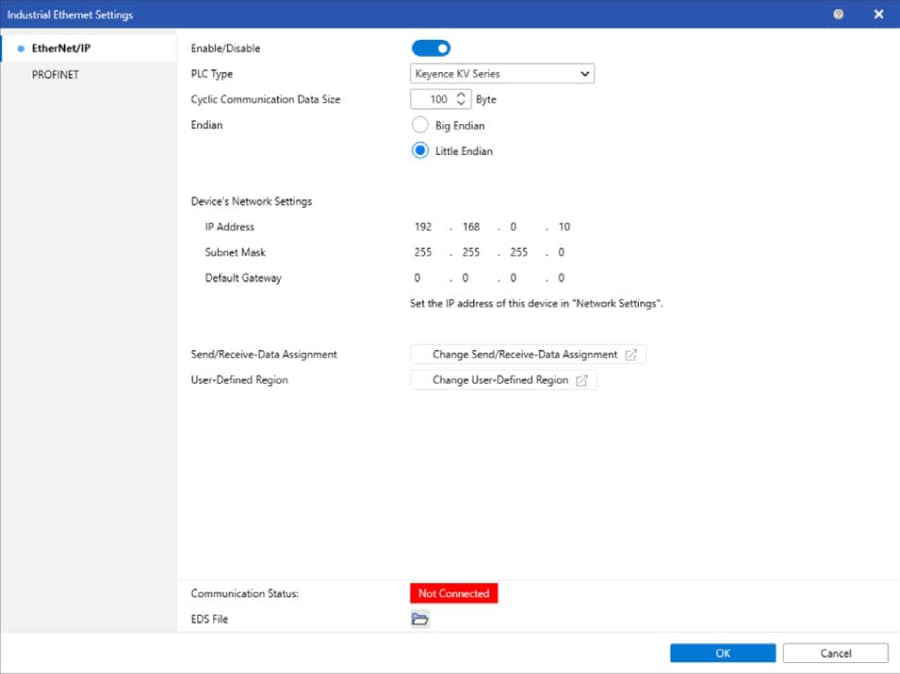

Adjust “Send/Receive-Data Assignment” and “User-Defined Region” as necessary.
For details, check the VS Series User's Manual.
-
*Other examples are included in the appendix.
5. When a confirmation dialog is displayed, select “Save and Reboot Now”.
One point
Changes to the [Ethernet] and [EtherNet/IP] settings of the VS Series are reflected upon rebooting the camera.
Step 3 : KV-X Series Connection Settings
This section explains how to connect with a fictitious device called "Vendor Series". Replace the "Vender Series" with the device to be connected.
One point
For the KV Series with a CPU function version of 2.0 or later, variables can be assigned to the connection of EtherNet/IP.
When assigning variables to the connection of EtherNet/IP®, check the box of “Displays the variable setting dialog when updating the EtherNet/IP settings (E)” for “Other settings” of “System settings” on the “CPU system settings” dialog.
The “CPU system settings” dialog is displayed by selecting [Display (V)] ⇒ [CPU system settings (P)] from the ”KV STUDIO” menu.
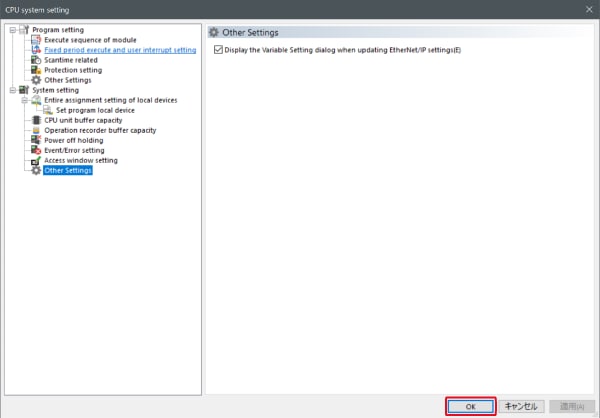
When the box of "Displays the variable setting dialog when updating the EtherNet/IP settings (E)" is checked, at the timing when the EtherNet/IP setting is updated and the changed content of the unit editor is confirmed, a dialog to assign variables to the connection is displayed.
1. Start up the KV STUDIO and create a new project. Set the model option to “KV-X520” and click [OK].
A [Confirm unit configuration setting] dialog box is displayed. Click [Yes (Y)].

2. The unit editor is displayed. On the “Setup unit(2)” tab, click the icon of EtherNet/IP setting. A configuration type selection dialog box is displayed. Click [Manual (M)].

3. On the “Unit setting (2)” tab, set the IP address for KV-X Series. In this example, configure the setting as shown below.
* Step 4 needs to be performed to import a sensor setting file. When the sensor setting file has already been imported, proceed to Step 5.

4. Select [EDS file (D)] → [Reg (I)] to import the KEYENCE sensor setting file(ez1 file) or EDS file.
* Download the sensor setting file from the KEYENCE website.

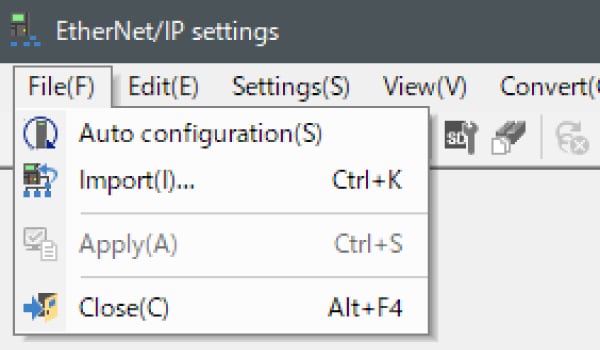
5. With the KV-X Series and the EtherNet/IP devices connected using the Ethernet cable, select [File (F)] → [Auto configuration (S)] on the [EtherNet/IP settings] window.
6. When the configuration on the unit editor differs from that of the actual device, a dialog for confirming transfer of the project is displayed. With the PC and KV-X Series connected using the USB cable, click [Yes (Y)].
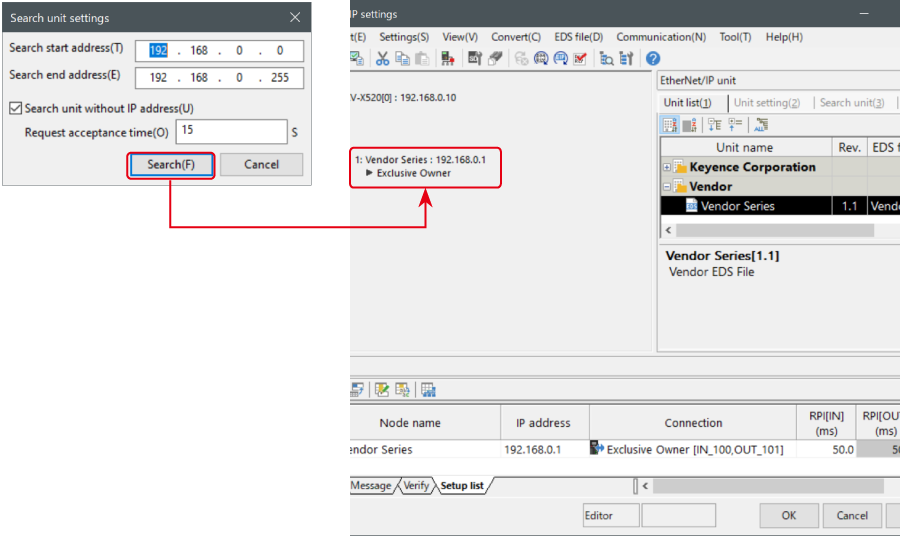
7. When transfer of the project is completed, the [Search unit settings] dialog is displayed. Then click [Search (F)]. After the auto configuration is completed, "Vendor Series" is automatically registered. Then click [OK] to close the [EtherNet/IP settings] window.
8. Click [OK] on the unit editor to exit.
One point
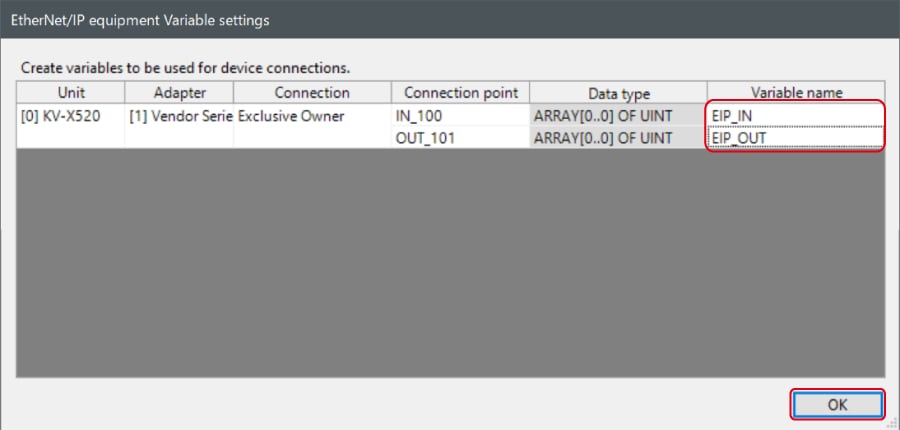
When the box of "Displays the variable setting dialog when updating the EtherNet/IP settings (E)" is checked, the [EtherNet/IP equipment Variable settings] dialog is displayed.
Enter the name of variable assigned to the connection, and click [OK].
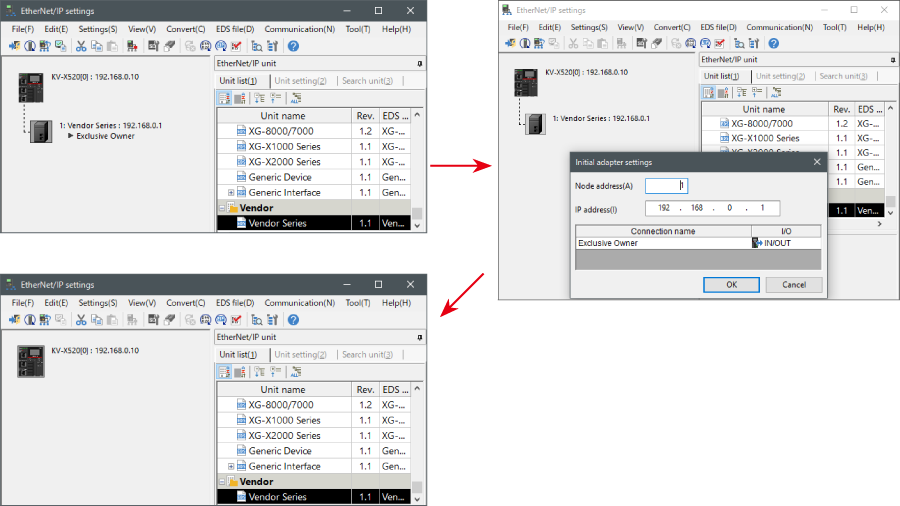
- The way of Device Configuration Settings manually
In the [Unit list (1)] tab of “EtherNet/IP Settings”, drag and drop "Vendor Series" and create a device configuration.
Transferring and Monitoring Setting Data
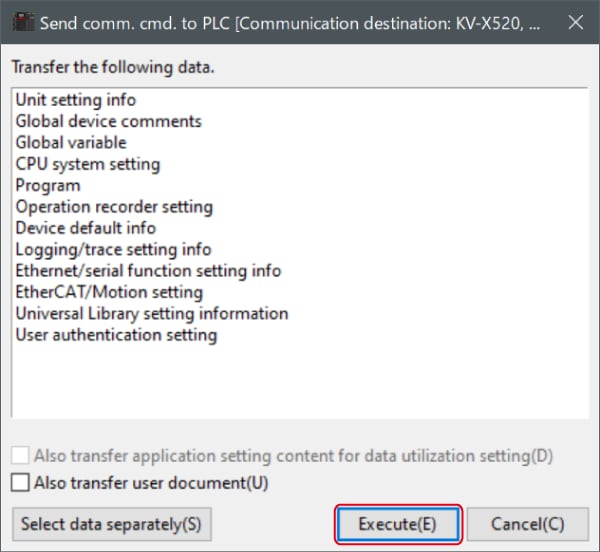
1. From the menu, select [Monitor/Simulator (N)] > [Transfer to PLC (W) → Monitor mode (C)].
In the [Send comm. cmd. to PLC] dialog box, click [Execute(E)].
2. If the following dialog box is displayed before and after transferring the data, click [Yes] both times.

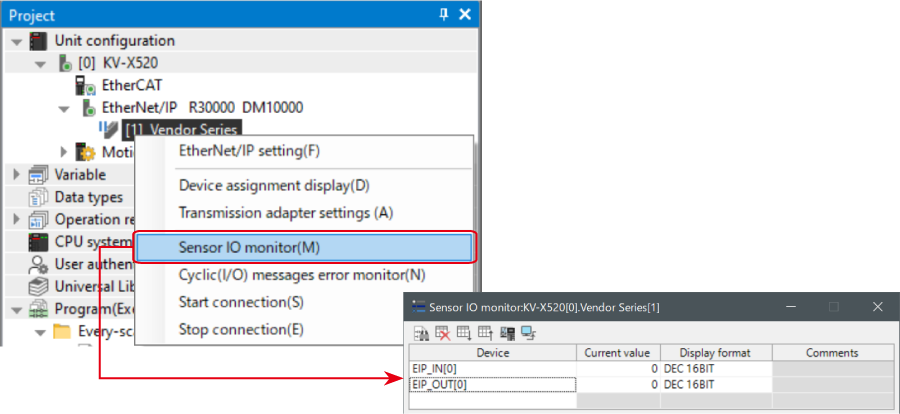
3. Right-click on “Vender Series” in the workspace, and select [Sensor IO monitor (M)].
Scores and other information can be easily monitored.
One point
The information can also be checked on a graph by starting up the real time chart monitor.
Right-click on “Sensor I/O monitor” and select [Real time chart monitor (H)].
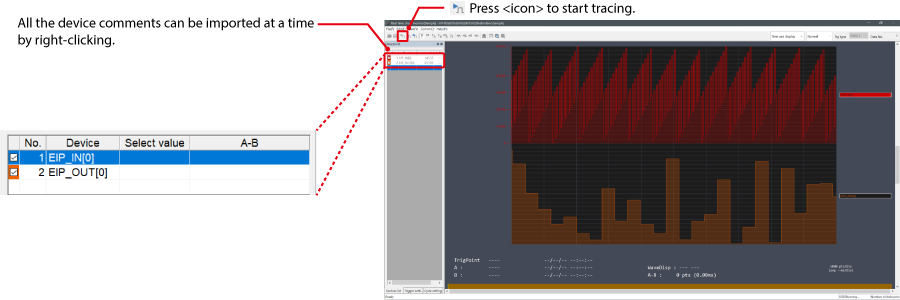
Range adjustment is not required since the real time chart monitor performs scaling automatically.
When Manipulating Parameters with a Program
Changing the Setting Values
The setting values of the sensors can be changed by the following two methods:
A : Change from a PC
B : Change from a ladder program
A : Change from a PC
To change the settings from a PC, use the transmission adapter function in KV STUDIO.
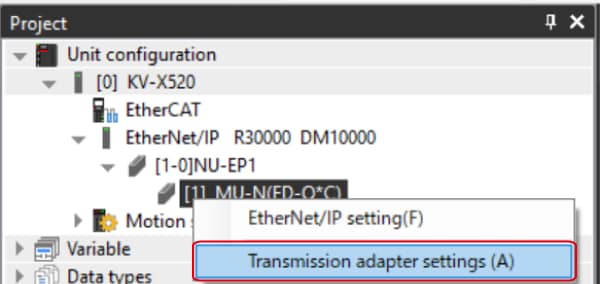
1. Expand the unit configuration in the workspace. Right-click on "Vender Series" and select [Transmission adapter settings (A)].
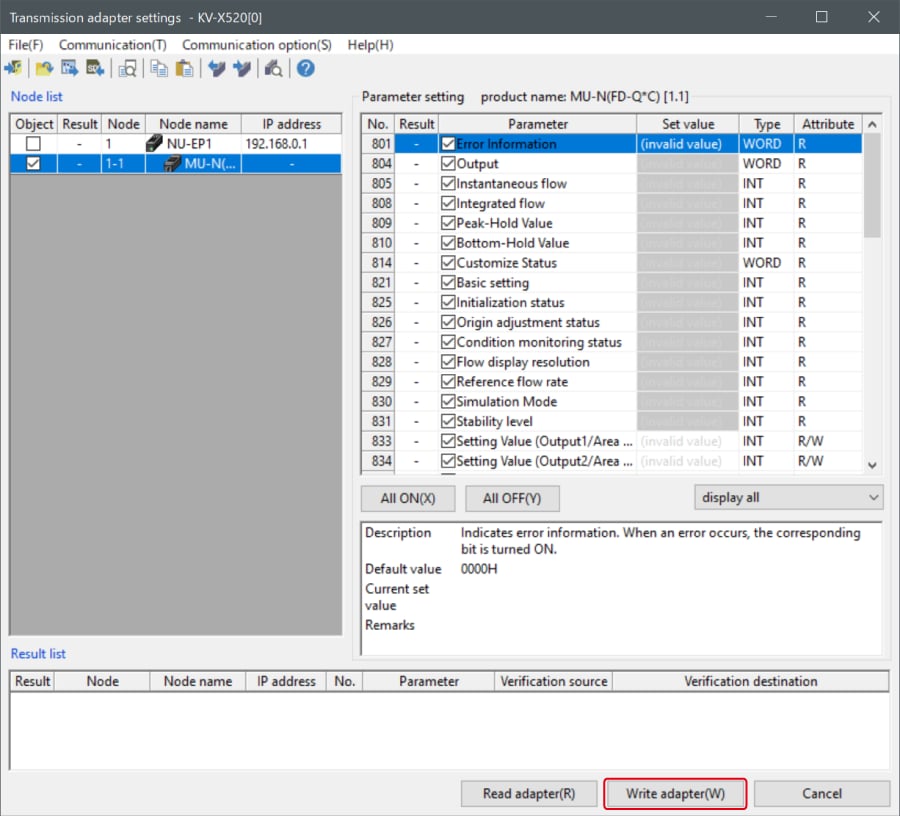
2. Place a check mark in Setting Value for "Vender Series" and enter the setting value.
Click [Write adapter (W)] to write the setting value to the sensor.
*To read the setting value of a sensor, select [Read adapter (R)].
B : Changed from a ladder program
Use message communication to change the setting values from a ladder program.
To perform message communication with KV STUDIO, use the sensor setting commands (SPWR [sensor parameter write] and SPRD [sensor parameter read]).

1. In Editor mode, create a ladder program as shown below.
* For the parameter numbers, refer to Parameter list.

2. Transfer the ladder program.
3. When MR100 is turned on, the setting value is changed.
* Store the setting value in DM4 ([Leading device to store results] + 4).
One point
RT (Real-Time) Edit function
When you use a ladder program, you can input device comments or parameter names directly to have input candidates be searched for and displayed automatically.

Step 4 : Create Ladder Program
1. Put KV STUDIO in Edit Mode. In the Ladder Program, create ladders for each control.
Control mode switching
Enter the current mode in the Execute Condition, and set Request Mode Switch to “ON”.
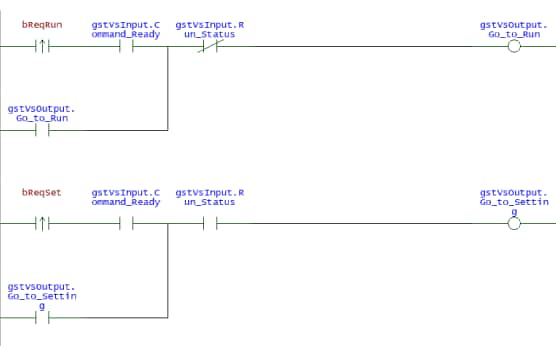
Mnemonic symbol list
LDP bReqRun
AND gstVsInput.Command_ready OR gstVsOutput.Go_to_Run
ANB gstVsInput.Run_Status OUT gstVsOutput.Go_to_Run LDP bReqSet
AND gstVsInput.Command_ready OR gstVsOutput.Go_to_Setting AND gstVsInput.Run_Status
OUT gstVsOutput.Go_to_Setting
Specify Command No. and issue capture instructions
Specify the Command No. and Program No., and set Command Request to “ON”. Next, set the Trigger to “ON”.
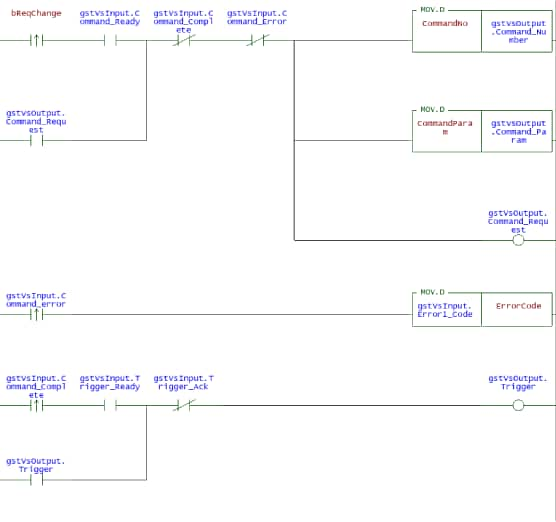
Mnemonic symbol list
LDP bReqChange
AND gstVsInput.Command_ready OR gstVsOutput.Command_Request
ANB gstVsInput.Command_complete ANB gstVsInput.Command_error
MOV.D CommandNo gstVsInput.Result_Data[#115] MOV.D CommandParam gstVsInput.Result_Data[#116] OUT gstVsOutput.Command_Request
LDP gstVsInput.Command_error
MOV.D gstVsInput.Error1_Code ErrorCode
LDP gstVsInput.Command_complete AND gstVsInput.Trigger_Ready
OR gstVsOutput.Trigger ANB gstVsInput.Trigger_Ack OUT gstVsOutput.Trigger
Get results
Get the capture results and set Get Complete to “ON”.
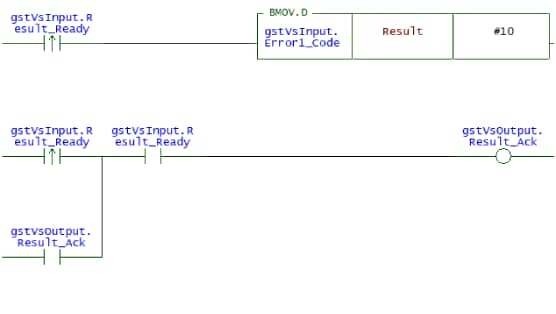
Mnemonic symbol list
LDP gstVsInput.Result_Ready
BMOV.D gstVsInput.Error1_Code Result #10
LDP gstVsInput.Result_Ready OR gstVsOutput.Result_Ack AND gstVsInput.Result_Ready OUT gstVsOutput.Result_Ack
-
*You may need to make settings according to the necessity of output data of the VS Series.
2. Transfer the created program to PLC.
Place a check in [Monitor/simulator(N)] > [Transfer to PLC → Monitor mode(C)] ⇒ [Transfer with PROGRAM Mode (P)], and click [Execute].
3. Set PLC to “RUN”.
4. When executing the above program in <KV STUDIO> monitor, apply control by setting the Execute Condition of “bReqRun” or “bReqChange”, etc. to “ON”.
Extra 1 : Memory map
VS Series [EtherNet/IP] Settings
A list of the parameters that can be exchanged using cyclic communication is shown below.
List of parameters that can be obtained in cyclic communication
The parameters that can be obtained during cyclic communication are automatically updated between the KV Series and VS Series at a fixed internal, so it is not necessary to have a program for reading and writing data. The following is a device map of the VS Series link devices.
VS Series → KV Series
| Member name | Data type |
|---|---|
| Trigger_Ready | BOOL |
| Trigger_Ack | BOOL |
| Pass | BOOL |
| Fail | BOOL |
| Result_Ready | BOOL |
| Run_Status | BOOL |
| Error0_Status | BOOL |
| Error1_Status | BOOL |
| Command_Complete | BOOL |
| Command_Error | BOOL |
| Command_Ready | BOOL |
| Prog_Load_Comp | BOOL |
| Prog_Load_Comp_SD | BOOL |
| Soft_Event_Ack | ARRAY[0..7] OF BOOL |
| Assignable | ARRAY[0..23] OF BOOL |
| Tool_Judge | ARRAY[0..31] OF BOOL |
| Error0_Code | UDINT |
| Error1_Code | UDINT |
| Program_Number | UDINT |
| Total_Count | UDINT |
| Command_Result | UDINT |
| Command_Data | ARRAY[0..5] OF UDINT |
| From_VS_Data | ARRAY[0..109] OF UDINT |
KV Series → VS Series
| Member name | Data type |
|---|---|
| Trigger | BOOL |
| Trigger_Disable | BOOL |
| Output_Disable | BOOL |
| Reset | BOOL |
| Rslt_Hndshk_Enable | BOOL |
| Result_Ack | BOOL |
| Go_to_Run | BOOL |
| Go_to_Setting | BOOL |
| Error0_Clear | BOOL |
| Error1_Clear | BOOL |
| Command_Request | BOOL |
| Prog_Load_Exec | BOOL |
| Prog_Load_Exec_SD | BOOL |
| Soft_Event | ARRAY[0..7] OF BOOL |
| Assignable | ARRAY[0..23] OF BOOL |
| Program_Number | UDINT |
| Command_Number | UDINT |
| Command_Param | ARRAY[0..5] OF UDINT |
| To_VS_Data | ARRAY[0..113] OF UDINT |
Extra 2 : Communication Data Settings
This part explains how to set communication data between the VS Series and PLC.
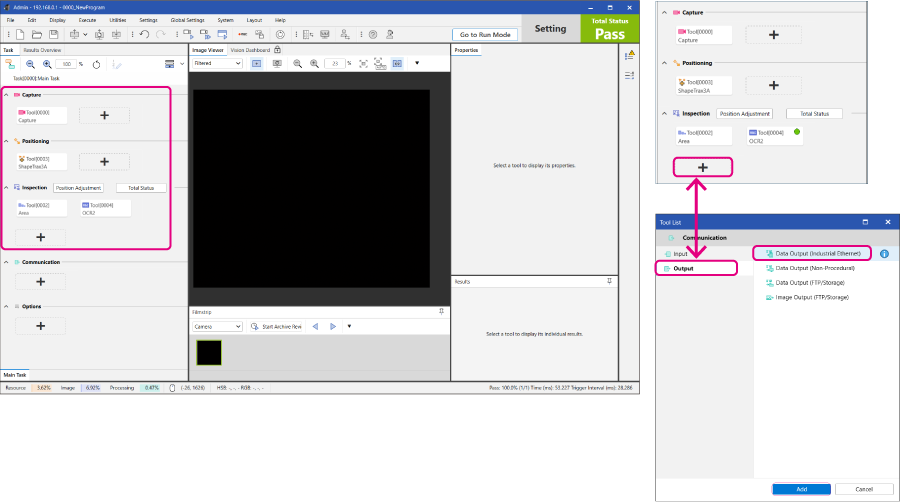
1. The example used here is a setting in the VS Creator Settings for outputting the following data.
Click the [+] button in “Communication” to display the “Tool List” dialog.
Click Output and select "Data Output (Industrial Ethernet)", then click Add.
2. Click the added “Data Output (Industrial Ethernet)”, then select “Bit Data Output” of “Properties” on the right side of the screen.
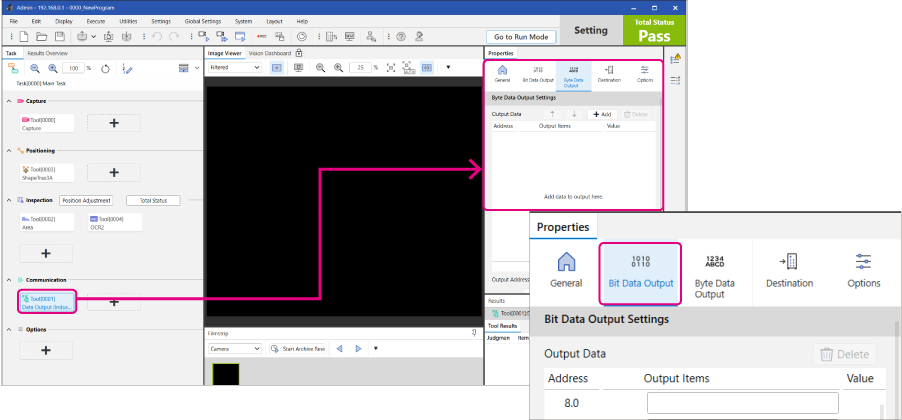
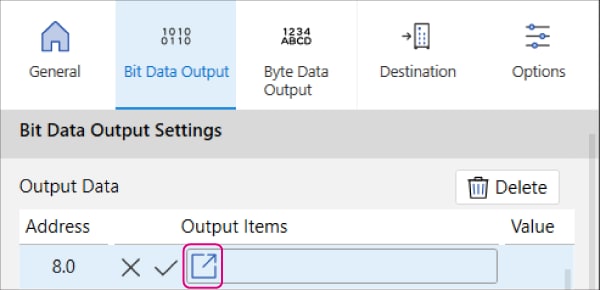
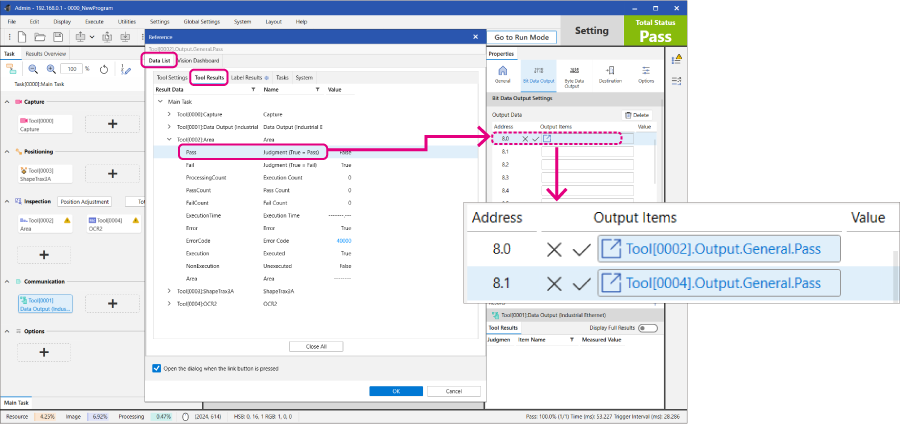
3. Select the “Output Items” column of the address and select the data to output.
These are the settings for outputting “Area Tool Judgment (True=OK)”, “OCR2 Tool Judgment (True=OK)”. Drag and drop to the output items location of the address.
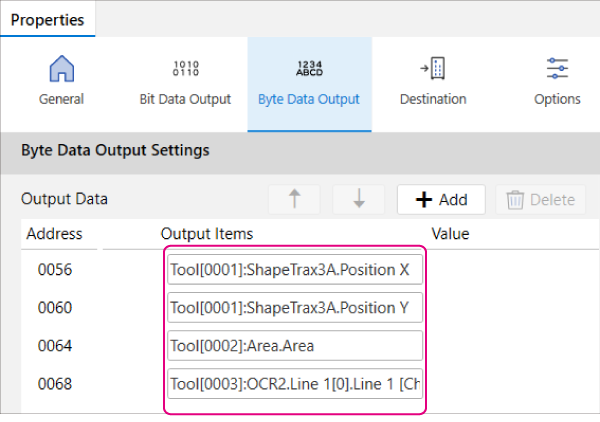
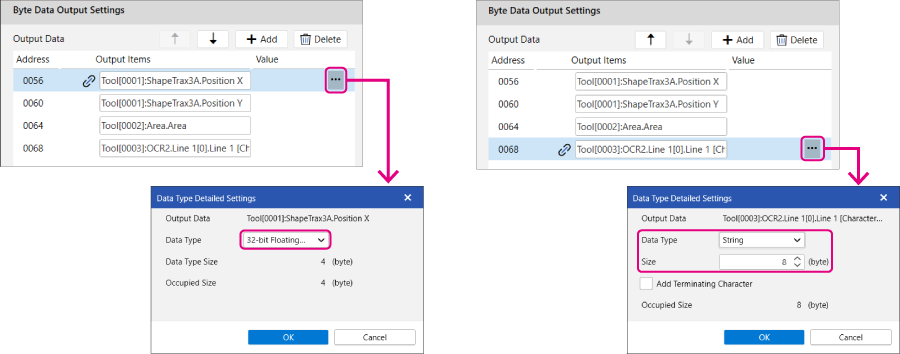
4. Set “Byte Data Output” in the same way. Data Type settings are also required for each of the output items.
