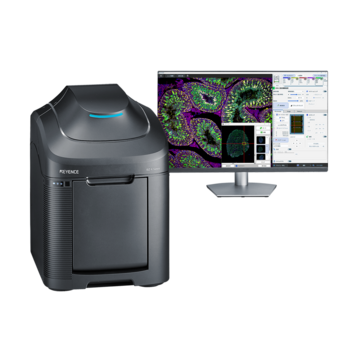
Fluorescence Microscopes
Top 10 Microscopy Troubleshooting Tips for Clearer Fluorescence Images
Even the most advanced fluorescence microscope can produce subpar results if small issues go unnoticed. Blurry details, weak fluorescence, or distracting background noise can all compromise your research. The good news? You can solve most problems with the right microscopy troubleshooting techniques and a systematic approach.
At KEYENCE, we work with research labs, universities, and industry professionals to solve imaging challenges, improve workflows, and recommend microscopy tools. Here are ten detailed tips to help you capture sharper, more reliable images.
How to Improve Fluorescence Microscopy Images
1. Perfect Your Sample Preparation
Strong images start with strong samples. Poor fixation, uneven mounting media, or a dirty coverslip can scatter light and blur your data before you even start imaging. Take time to ensure your specimen is properly fixed, stained, and mounted. You should also use high-quality, clean coverslips and ensure no air bubbles are trapped under the sample before sealing it.
2. Use Fresh, Well-Stored Fluorophores
Fluorophores are highly sensitive to light and temperature, and improper storage can quickly lead to loss of signal intensity. A degraded dye leads to a dimmer image. It can also lower contrast, hide important details, and affect the accuracy of your results.
To get the most from your fluorophores, treat them as carefully as your samples:
- Protect from light: Store fluorescent dyes and conjugates in dark containers, minimize their exposure, and protect them from light during preparation.
- Avoid repeated freeze–thaw cycles: Aliquot stock solutions into smaller volumes so you only thaw what you need.
- Follow the manufacturer's guidelines: Temperature, buffer, and storage recommendations can vary. Sticking to these guidelines helps ensure the best shelf life and performance.
3. Dial In Exposure Time Using Binning and Gain
When your fluorescence image is too dark, there are several different ways to improve the brightness. The most common methods are to adjust the exposure time and/or increase the binning or gain. However, you must exercise caution when making any of these adjustments as each can have an impact on the image quality by negatively affecting noise and resolution. For example, an overly high exposure can oversaturate and bleach your sample. Instead, make small changes to exposure, and aim for a signal that is bright enough to see without losing fine details.
The table below generally shows the impact that these different brightness adjustments can have. Understanding these characteristics can help you to effectively choose the best method for improving brightness based on the situation.
| Dark current noise | High-sensitivity noise | Image resolution | Explanation | |
|---|---|---|---|---|
|
Increase the exposure time.
|
Dark current noise
Increases
|
High-sensitivity noise
|
Image resolution
|
Explanation
This is the amount of time that the shutter is open. The longer that you set the time, the brighter the image becomes, but this also has the effect of increasing the noise caused by dark current.
|
|
Increase the gain.
|
Dark current noise
|
High-sensitivity noise
Increases
|
Image resolution
|
Explanation
This function electrically amplifies the signal that is received by the imaging element. Therefore, the noise is also amplified. The image resolution is not impacted.
|
|
Increase the binning.
|
Dark current noise
|
High-sensitivity noise
|
Image resolution
Decreases
|
Explanation
This function virtually combines neighboring pixels as a single pixel to increase the received signal quantity per unit pixel. Therefore, the image resolution decreases, but the noise does not increase.
|
The BZ-X Automated Fluorescence Microscope incorporates a high-sensitivity, 10-megapixel monochrome CMOS camera to capture even faint fluorescence signals across a broad wavelength spectrum. Combined with an integrated darkroom, this system is able to capture publication-quality images while minimizing exposure to your sample.
Get detailed information on our products by downloading our catalog.
View Catalog

4. Keep Your Microscope Objectives Spotless
Even the most advanced fluorescence microscope can’t overcome the haze caused by a single fingerprint, speck of dust, or smudge on a lens. Contaminants scatter excitation light, reduce contrast, and ultimately limit the resolution you’re able to achieve.
Regular maintenance is essential. Objectives, condenser lenses, and filters should be cleaned gently with lens paper and approved solutions, always following the manufacturer’s protocol to avoid damaging sensitive optical coatings. But cleanliness isn’t just about occasional cleaning; it’s also about preventing contamination in the first place.
Here are a few simple habits that can help to keep equipment in top condition:
- Use a microscope dust cover whenever the microscope is not in use.
- Handle objective lenses with care, avoiding unnecessary contact with glass surfaces.
- Store microscope filters and objectives properly in clean, dry containers to prevent buildup.
- Work in a clean environment to reduce airborne particles settling on components.
5. Prevent Photobleaching
Photobleaching is irreversible—once your fluorophores are gone, so is your signal. Reducing light intensity and exposure time are critical to prolonging the lifetime of your sample. Between image captures, shutter the excitation light to protect your sample. Some advanced systems can sync movements on the microscope with the light source. This way, the sample only gets lit briefly when a change is made.
![]()
Example of applying a shutter to excitation light to reduce the amount of exposure to light
-
1Normally off
-
2Automatically turns on for an instant when required such as when focusing the image and when moving the field-of-view.
The BZ-X utilizes a Low Photobleach mode that synchronizes microscope adjustments (e.g. focus, stage movement, etc.) with the excitation light. Using this function, a shutter is automatically applied to prevent high-intensity light from hitting a sample. Once an adjustment is made, a pulse of light will hit the sample and display the resultant image. The excitation is then blocked again until another adjustment is made.

6. Nail the Focus and Z-Stack
Fluorescence imaging often involves thicker samples, where the region of interest may not be in a single focal plane. Use fine focus adjustments to pinpoint the sharpest plane or capture a Z-stack to reconstruct your sample in 3D. This ensures you don’t miss important structures hidden in other layers. More advanced systems can also incorporate an auto focusing feature that automatically scans a sample in the Z-direction and quickly finds the sharpest focus.
General Lens Characteristics
Other factors include cover glass correction, correction ring adjustment, and lens characteristics to match specialized observations. Use the appropriate lens to match your observation method.
![]()
![]()
Adjust the Lens from a Low Magnification to a High Magnification
To locate your target efficiently, be sure to first search with a low-magnification lens with a wide field-of-view. Increase the magnification after you have narrowed down the search area to a certain region.
![]()
To Focus the Image, Position the Lens Close to the Sample, Then Move It Away from the Sample
For microscopes that do not have a collision prevention function, it is possible for the lens to strike the sample. Therefore, first position the lens close to the sample, and then gradually move it away from the sample to adjust the focus.
The BZ-X Automated Fluorescence Microscope is able to quickly and accurately find focus on a sample with just the click of a button. Additionally, a Z-stack can be captured and the images can be combined into a single, fully-focused image or turned into a 3D rendering. For thicker samples, an Optical Sectioning method using Structured Illumination can be used to eliminate out-of-focus fluorescence for improved visualizations.

7. Verify Microscope Filter and Light Path Alignment
If your excitation and emission filters are slightly off, you could lose significant signal strength. Check that filter cubes are seated correctly, dichroic mirrors are aligned, and light paths are optimized for your chosen fluorophores. Misalignments are a silent killer of image quality.
You should also check your microscope filters and dichroic mirrors for cleanliness. Many times, these can accumulate debris or fingerprints that may impact your fluorescence image quality. You should follow the manufacturers' guidelines for how to clean these properly.
8. Match Fluorescence Filters to Your Fluorophores
Even if your filters are perfectly aligned, they won’t help if they’re the wrong match for your dye’s excitation/emission spectrum. Before imaging, check your fluorophore’s datasheet and confirm that your filter sets are optimized for that wavelength range.
If it’s difficult to understand how to match the filter and reagent using numeric values, then you can view the spectral data of the reagent and filters to check their overlap. This information should be readily available from the manufacturers’ websites.
![]()
Use a filter that has as high a transmissibility as possible. Even bright fluorescence signals will be reduced by 30% if the filter has a transmission ratio of 70%.
* It is not always necessary to cover the reagent’s peak.
9. Reduce Background with Proper Washing
A common frustration in fluorescence microscopy is high background signal (background noise). When excess fluorescence overwhelms your image, it can mask subtle details and make interpretation difficult. The key to improving clarity often lies in something simple: proper washing.
During staining, unbound fluorophores and non-specific labeling can cling to samples, creating haze and unwanted noise. Thorough washing steps help remove these residuals, ensuring that only true signals remain visible. Using fresh buffers and clean containers further reduces the risk of cross-contamination, keeping your results consistent and reliable.
10. Process Images Responsibly
When it comes to fluorescence microscopy, capturing the image is only half the story—how you process it makes all the difference. Post-processing tools can help reveal subtle details and bring clarity to complex samples, but going too far can introduce misleading artifacts or distort the true data.
That’s why the best results come from a balanced approach. By making minimal, consistent adjustments, and keeping raw data intact, researchers can ensure their images remain both visually compelling and scientifically accurate. High-quality microscopes and software platforms make this easier by offering intuitive processing tools that enhance visibility without compromising integrity.
With the right imaging system, you can:
- Confidently enhance faint signals while protecting original data.
- Apply standardized workflows for consistent, reproducible results.
- Share images that are both publication-ready and trustworthy.
Publication-Ready Images
Clear, high-quality fluorescence images require more than just a good microscope—they demand attention to detail, consistent maintenance, and thoughtful adjustments during every stage of the imaging process. By following these microscopy troubleshooting tips, you can reduce frustration, save time, and capture data you can trust.
Contact us today to discuss your imaging challenges and find the right solution.