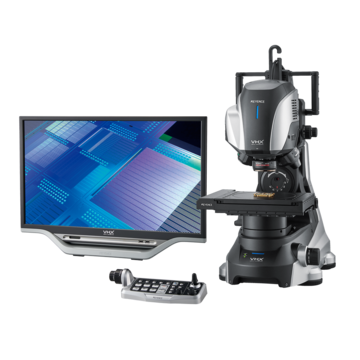
Digital Microscopes
Corrosion Observation and Analysis
Metallic materials, which are used in automobiles and various other products, can corrode drastically in unexpected areas and cause fractures.
Analysis of corroded parts is important to determine causes and prevent reoccurrences, and microscopes are used to observe the forms of corroded parts. Observation using conventional microscopes, however, has various problems.
This section explains the corrosion test procedure and the forms and causes of corrosion while introducing examples of using a 4K Digital Microscope to solve problems.
Corrosion Test Importance and Procedure
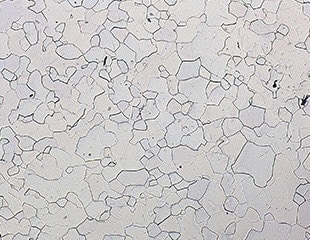
Corrosion refers to the phenomenon in which metallic and other solid materials are deteriorated, consumed, or damaged due to chemical or electrochemical reactions with the surrounding environment, leading to loss of original functions. There are various forms of corrosion such as intergranular corrosion, pitting, crevice corrosion, contact corrosion, and stress corrosion cracking (trans granular cracking and grain boundary cracking), all of which differ depending on the material and the environment.
To investigate the causes of corrosion and prevent reoccurrences, corrosion tests are conducted in a wide variety of industries. In particular, corrosion tests are important for products, such as automobiles, that are composed of various materials and whose safety is required in various outdoor environments.
In general, corrosion tests are conducted according to the following procedure.
Corrosion test procedure
-
1Appearance observation of the area where corrosion has occurred
Check the area where corrosion has occurred, the color of the item, and the status of the corroded parts. -
2Observation by cutting out or removing the corroded parts
Cut out the corroded parts. If it is difficult to cut them out, remove only the corroded parts. -
3Detailed observation of the corroded parts and elemental analysis of the corroded substances
(1) Using a microscope, observe the surface of the corroded parts in detail to check the status of the corroded parts and substances. In some cases, the corroded parts are cleaned to check for pitting and other corrosion on the surface of the substrate.
(2) Analyze the constituents of the corroded substances (element analysis) to confirm the substance that promotes corrosion. -
4Cross-sectional observation of the corroded parts
If necessary, process the corroded parts into cross-sectional samples to check the progress of corrosion. Composition analysis (element analysis) may also be conducted for a cross section.
Get detailed information on our products by downloading our catalog.
View Catalog

Forms, Examples, and Causes of Local Corrosion
Many problems related to corrosion are said to be caused by local corrosion occurring at locations where its development rate is hard to forecast. Also, damage on the protective coating of metal surfaces may cause local corrosion, leading to local damage.
Typical forms and causes of local corrosion that can cause damage are described below.
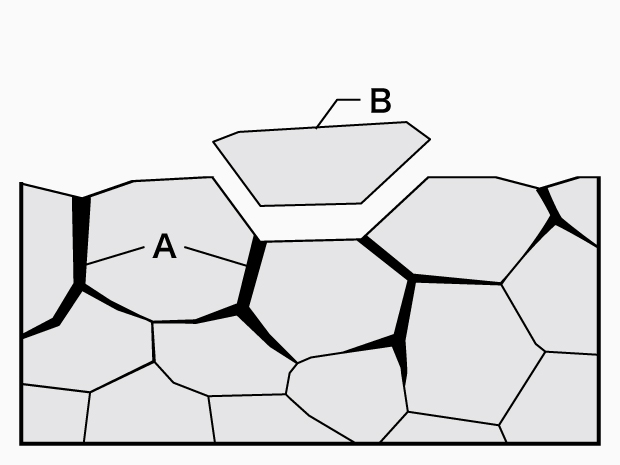
A. Intergranular corrosion B. Shedding
Intergranular corrosion
- Phenomenon:
Corrosion caused by impurities and inclusions on grain boundaries with low corrosion potential. Shedding, in which intergranular corrosion causes grains to fall off, may also occur. - Examples:
This phenomenon occurs at locations where stainless steel or aluminum alloys have not been heat-treated properly or sufficiently. It also occurs at zones affected by welding heat. - Causes:
On the material side: Lowered grain boundary chromium concentration, grain boundary segregation of trace constituents, grain boundary deposits, etc.
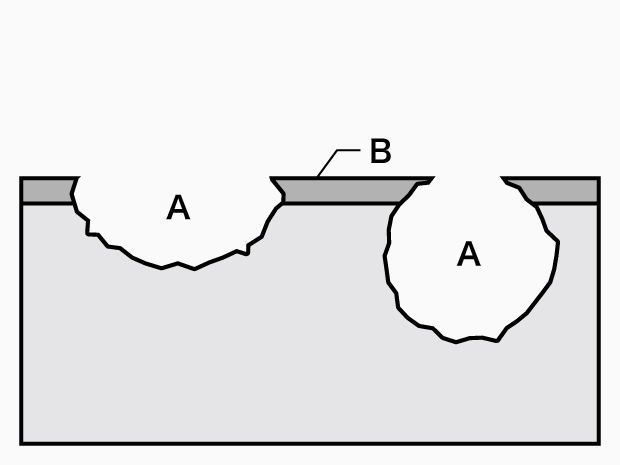
A. Pitting B. Passivation film
Pitting
- Phenomenon:
Corrosion occurring at very limited locations on metal surfaces maintaining a passive state (passivation films) that proceeds deeply in a small hole diameter. - Examples:
A passivation film locally damaged by halogen ions (such as Cl-), resulting in corrosion in the shape of a hole. This is triggered by metal non-uniformity such as non-metallic inclusions in aqueous chloride solution of stainless steel and aluminum alloys. - Causes:
On the environment side: Halogen ions, dissolved oxygen.
On the material side: Inclusions, defects, etc.
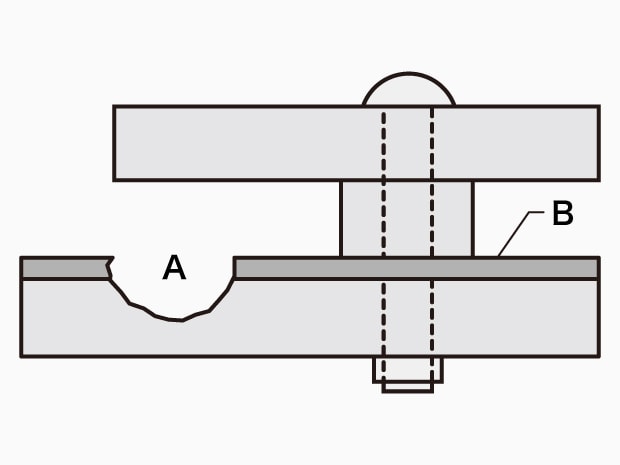
A. Crevice corrosion B. Passivation film
Crevice corrosion
- Phenomenon:
Corrosion caused by lack of dissolved oxygen in crevices, which damages passivation films on metal surfaces, causing metals to melt. - Examples:
This phenomenon occurs on stainless steel, aluminum, and titanium flange faces. - Causes:
On the structure/material side: Crevice structure, oxidized scale, etc.
On the environment side: Halogen ions, dissolved oxygen (the growing phase is the same as that for pitting).
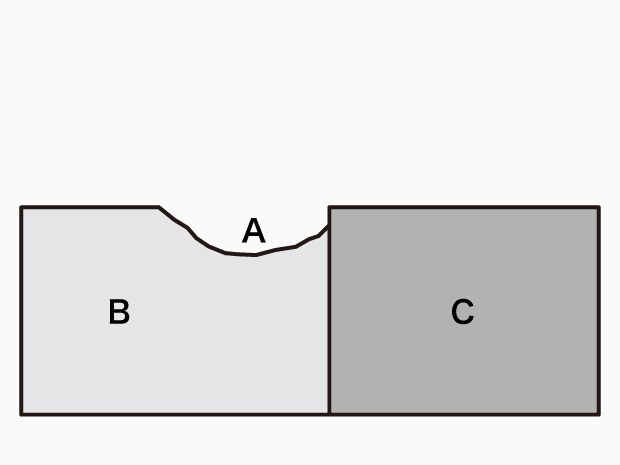
A. Corroded part B. Base metal C. Noble metal
Contact corrosion (bimetallic contact corrosion and galvanic corrosion)
- Phenomenon:
Corrosion that occurs on and is promoted on base metals due to the contact between metals having different electrode potentials and the existence of electrolyte solution on the contact point. - Examples:
Contact between aluminum and copper corrodes the aluminum, and contact between steel and stainless steel corrodes the steel. - Causes:
On the material side: Contact between metals having different electric potentials.
Stress corrosion cracking
- Phenomenon:
Corrosion caused by tensile stress (residual stress or external load stress), which locally damages the protective coating on the surface. Concentrated progress of corrosion will lead to cracking. - Types of cracking forms:
As the route in which stress corrosion cracking proceeds varies depending on the combination of metal and environment, there are also differences in cracking forms.
A transgranular crack proceeds through grains while a grain boundary crack proceeds along grain boundaries. - Causes:
Transgranular crack: Inclusions, deposits, surface coating, material defects, etc.
Grain boundary crack: Grain boundaries of trace elements, segregation, grain boundary chromium-depleted-layers, grain boundary deposits, grain boundary irregularity, etc.
Transgranular crack
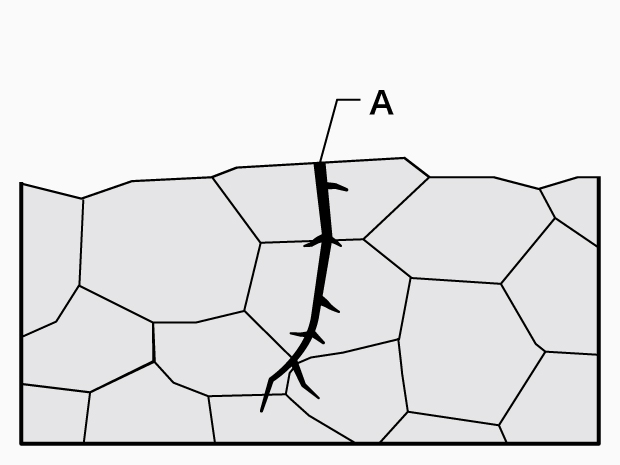
A. Transgranular crack
Grain boundary crack
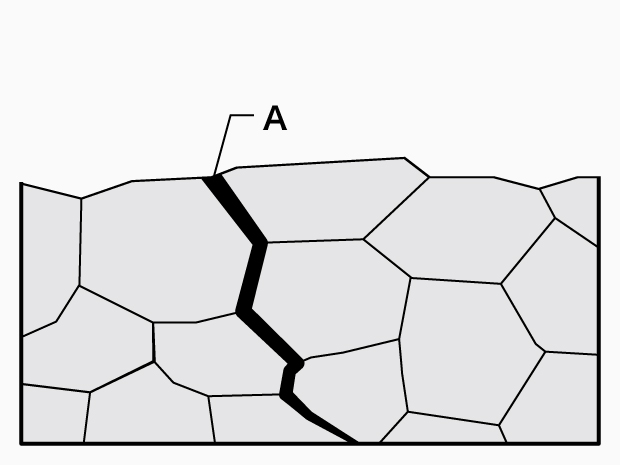
A. Grain boundary crack
We’re here to provide you with more details.
Reach out today!

Actual Examples of Solved Problems in Corrosion Tests
As causes of corrosion can be identified on the basis of the forms of corrosion, appearance observation and detailed observation using microscopes are important for corrosion test.
Corroded parts have three dimensional shapes, so observation of corroded parts using conventional microscopes have various problems, for example, in adjusting the focus and extracting lighting conditions. Also, it is sometimes difficult to observe intergranular corrosion or corrosion cracking in detail due to insufficient resolution.
KEYENCE's VHX Series ultra-high-definition 4K Digital Microscope uses a high-resolution lens, a 4K CMOS, and a specially designed observation system. These and other built-in technologies not only solve problems with conventional microscopes but also enable accurate and quick observation and analysis with simple operation using high-resolution 4K images.
This section introduces application examples of the multifunction VHX Series 4K Digital Microscope, with a focus on solving problems with conventional microscopes in analysis of corroded parts.
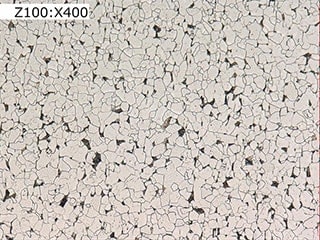
Observation of grain boundaries using high-accuracy, high-resolution images
Conventional problems with microscopes
Insufficient resolution in high-magnification observation prevents clear observation of grain boundaries and the intergranular corrosion occurring there.
With the VHX Series 4K Digital Microscope
The high-resolution lens and 4K CMOS enable observation using high-resolution, high-definition 4K images even in high-magnification observation of grain boundaries.
Hence it is possible to observe intergranular corrosion, shedding, and stress corrosion cracking (transgranular cracking and grain boundary cracking) in detail with clear images.
Observation of grain boundaries using the VHX Series 4K Digital Microscope
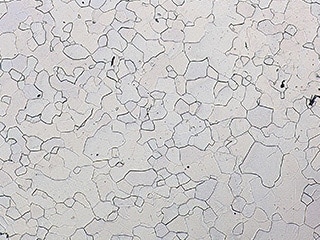
Observation of normal grain boundaries (right: 400x)
Fully focused observation of the entirety of a three-dimensional corroded part
Conventional problems with microscopes
Because corroded parts are three dimensional, only a part of the target can be brought into focus at a time due to the limitations of the depth of field of conventional microscopes, which prevents observation while tracking the entire image. This causes problems such as different evaluation results occurring between operators and details being overlooked.
With the VHX Series 4K Digital Microscope
The high-resolution lens that enables a deep depth of field and detailed observation, the 4K CMOS, and the real-time depth composition make it possible to instantaneously obtain a high-definition 4K image, with the entire target fully focused, through simple operation.
There is no need to adjust the focus for each observation point, enabling quick observation from any angle.
Observation of corroded parts using the VHX Series 4K Digital Microscope
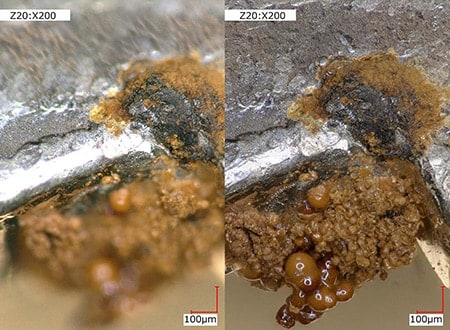
Corroded part of an automotive component Left: normal/right: depth composition (200x)
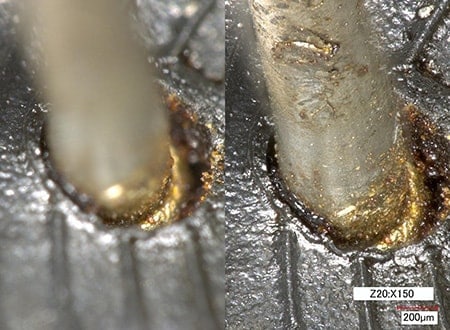
Corroded part of a connector Left: normal/right: depth composition (150x)
Observation of corrosion patterns without lighting adjustments
Conventional problems with microscopes
Observation of metallic corroded parts makes it difficult to extract lighting conditions and requires repeated lighting adjustment before observing corrosion patterns. The result is that such observation takes a lot of time and effort.
With the VHX Series 4K Digital Microscope
With the push of a button, the multi-lighting function can quickly obtain multiple images with lighting from all directions. By simply selecting the image most suitable for observation, users can perform observation using a clear image.
This function eliminates the time and effort that were conventionally spent on extracting lighting conditions and enables quick observation with high-definition images under the optimal lighting.
Furthermore, other multi-lighting image data is automatically saved even after the observation image is selected, so observation can be performed under different lighting conditions simply by reselecting an image. This function can eliminate the time and effort that were conventionally required to set the sample on the stage once more and to readjust lighting.
Observation of a corroded coin using the VHX Series 4K Digital Microscope

Normal (200x)
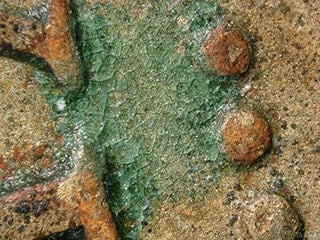
Multi-lighting (200x)
We’re here to provide you with more details.
Reach out today!

A Microscope That Changes Corrosion Tests
In addition to the functions introduced here, the VHX Series high-definition 4K Digital Microscope is equipped with many more useful functions for analyses and tests.
As well as high-definition observation of corroded parts, the VHX Series seamlessly enables highly accurate 2D and 3D measurement on the submicron order and automatic area measurement, which is useful for quantitative evaluation of grain boundaries.
Furthermore, with the VHX Series a single unit is all that is required to complete observation, measurement, analysis, and reporting.
For additional product info or inquiries, click the buttons below.
Get detailed information on our products by downloading our catalog.
View Catalog