Digital Microscopes
Measurement and Analysis of Die Casting Defects
Die-casting is becoming an increasingly common way to manufacture automotive components. With this spread, fast measurement and quantitative evaluation are required at casting manufacturing sites to identify defects and their causes to improve the quality and the yield rate.
In addition to causes and countermeasures for casting defects, this section introduces the latest inspection examples of die-casting using the new 4K Digital Microscope.
Increase in Automotive Die-Casting
Die-casting is a casting method in which molten metal such as aluminum alloy, zinc alloy, magnesium alloy, and copper alloy is poured into precision molds under high pressure. This method is used for various products because of its ability to provide excellent dimensional accuracy, beautiful and smooth cast surfaces, and high productivity.
It is said that automotive components account for a majority of all the die-cast products manufactured.
In particular, aluminum alloy die-casting is frequently used in automotive components because it features higher electrical/thermal conductivity, corrosion resistance, and workability as well as a lighter weight and a higher strength compared to zinc alloy die-casting, thereby achieving products with low cost and high recycle efficiency.
Automotive applications include cylinder blocks, transmission cases, and rocker covers. Conventional die-cast products often contain gas, which makes heat treatment and welding difficult, so it is said that it is difficult to apply such products to automotive undercarriage and body components. In recent years, however, special die-casting methods, such as laminar flow die-casting and high-vacuum die-casting, have led to the application of die-casting in more difficult products. Along with this trend, requirements for the functionality and quality of casting have also increased.
Get detailed information on our products by downloading our catalog.
View Catalog

Causes of and Countermeasures for Casting Defects
In die-casting processes for automotive components, caution is required for the temperature of molten metal and molds, the pressure during filling into molds, and casting defects caused by gas and air contained in metals. Casting defects will lead to lower strength and thus greatly affect the safety quality of automobiles.
Typical defects that occur inside or on the surface of casting, such as cast holes, and their causes and countermeasures are listed in the table below.
Typical casting defects
| Casting defect | Cause/state | Countermeasure |
|---|---|---|
|
|
A blow hole generated by entry of air or gas in molten metal or a sinkage generated due to a short supply of molten metal |
Adjust the casting pressure, change the vent hole, adjust the amount of mold release agent to be applied, or change the position and size of the gate. |
|
|
Depression following slow cooling due to a partially overheated mold |
Adjust the mold temperature or redesign the mold. |
|
|
The area near the gate cools down too quickly to fill the entire cavity with molten metal. |
Change the mold temperature, adjust the molten metal temperature, or change the position and size of the gate. |
|
|
A low mold temperature and a low pouring pressure cause molten metal to solidify before spreading entirely in a pair of molds, generating a mark at the joining point. |
Raise the mold temperature, the molten metal temperature, and the plunger speed or change the position and size of the gate. |
|
|
An insufficient draft angle, an uneven shrink, or an improper extrusion (hot cracking during solidification and cold cracking in cooling processes and over time) |
Redesign the shape or change the extrusion position. |
|
|
A solidification layer generated in the sleeve enters the cavity and is then contained in the die-casting. |
Adjust the molten metal temperature and the plunger speed. |
|
|
A low mold temperature or too much mold release agent |
Raise the mold temperature and reduce the amount of mold release agent. |
|
|
Die-casting adhered to a mold when being ejected or an improper draft angle |
Sufficiently polish the mold surface and provide an appropriate draft angle. |
|
|
A partially overheated mold causes adhesion with the molten metal. |
Change the type or application method of mold release agent or redesign the mold. |
|
|
Compressed gas near the surface expands and causes swelling on the surface. |
Take the same countermeasures as for cast holes and extend the mold cooling time. |
|
|
The die-cast surface is discolored by one or more mold release agent components. |
Change the agent. |
|
|
A rough mold surface is transferred directly to the die-cast surface. |
Clean and polish the mold. |
|
|
A hard foreign particle enters into the molten metal causing, for example, grinding tool breakage in later processes. |
Filter the molten metal. |
In addition to those causes listed above, there are various other causes for casting defects. In die-casting, quality inspection is important to ensure quality. Accurate analysis, measurement, and evaluation are required, for example, for minute holes, cavities, and improper surface roughness because they have an impact on quality.
We’re here to provide you with more details.
Reach out today!

Latest Examples of Die-Cast Product Inspection
One of the requirements for the evaluation and defect analysis of cast holes and cast surfaces is magnified observation using microscopes. However, because die-cast products are three dimensional, such observation involves problems like the time and effort required for focus adjustment, difficulty of observation and analysis, and variations in defect evaluations.
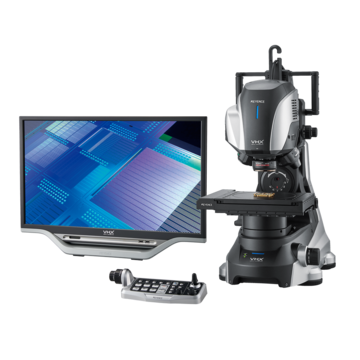
These factors have led to an increase in magnified observation using Digital Microscopes. KEYENCE's VHX Series ultra-high-definition 4K Digital Microscope, which is fully equipped with state-of-the-art technology, makes it possible to clearly capture cast holes and cast surfaces in die-casting to enable quantitative evaluation with extremely high work efficiency.
Zoomed imaging while keeping the target fully in focus even at increased magnification
Conventional microscopes require time and effort to replace lenses, to change the magnification, and adjust the focus according to the size and location of the target for analysis.
The high-resolution lens and motorized revolver of the VHX Series 4K Digital Microscope enable a seamless zoom function that automatically changes the magnification between 20x and 6000x without lens replacement. Through intuitive operation with a mouse or a handheld controller, you can quickly complete a series of tasks all in a single unit. These tasks range from observation using fully focused high-resolution images of the entire target (using depth composition) to quantitative evaluation using automatic area measurement and 3D shape/profile measurement.
Zoomed imaging of die-casting using the VHX Series 4K Digital Microscope
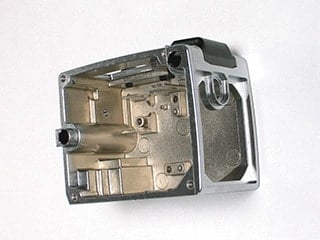
(5x)
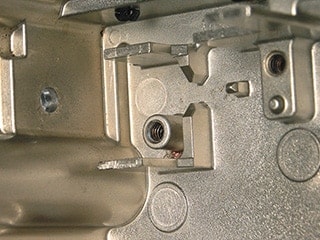
(10x)
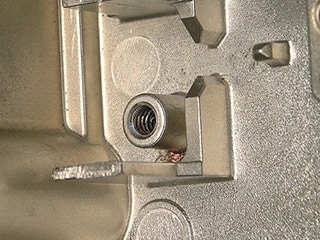
(20x)
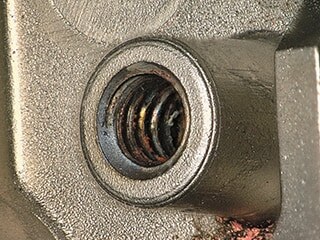
(50x)
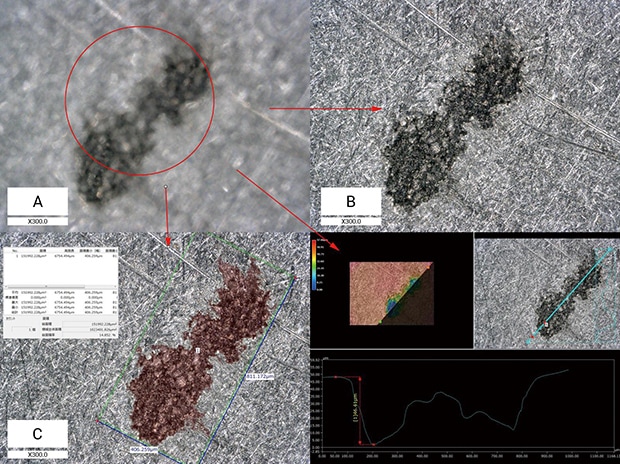
A: Conventional microscope B: Digital microscope C: Digital microscope (Area measurement)
Compared to the image captured using a conventional microscope, the VHX Series offers an overwhelmingly clear image, automatic area measurement, and 3D shape/profile measurement
Depth composition and measurement of a cast hole using the VHX Series 4K Digital Microscope
3D shape and profile measurement of a cast hole
The VHX Series 4K Digital Microscope enables the measurement of 3D shapes and profiles (2D cross-sectional shapes) using height information that could not be obtained with conventional microscopes. Even on an uneven die-cast surface, you can recognize cast holes, blow holes, and all other such minute surface shape changes thanks to the 3D display that fully focuses the entire target.
3D shape and profile measurement of a cast hole using the VHX Series 4K Digital Microscope
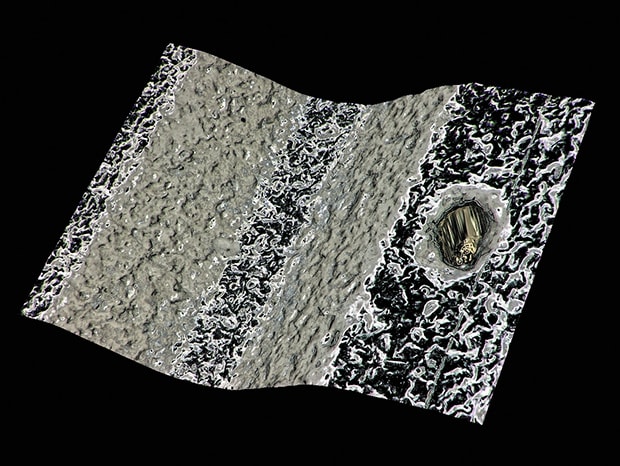
3D shape of a cast hole (200x)
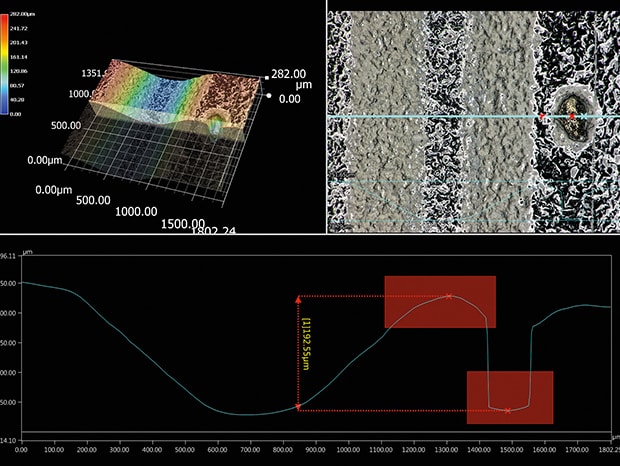
Profile measurement of a cast hole
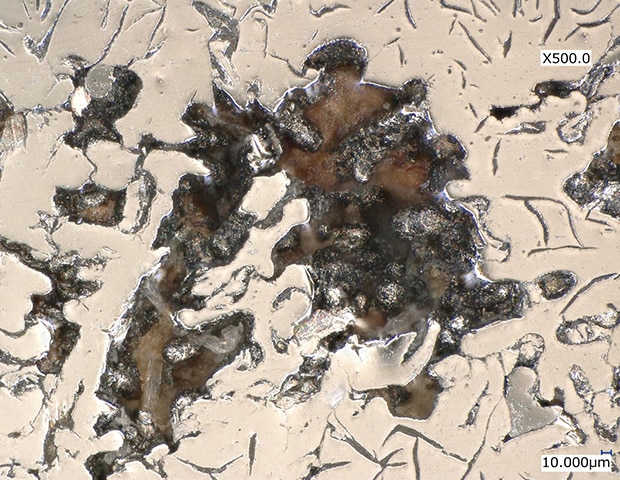
High-magnification image of a minute cast hole
Microscopes conventionally used for cast hole observation have problems such as insufficient magnification, resolution, and focus adjustment.
With the VHX Series 4K Digital Microscope, even minute cast holes can be captured clearly and at high magnification.
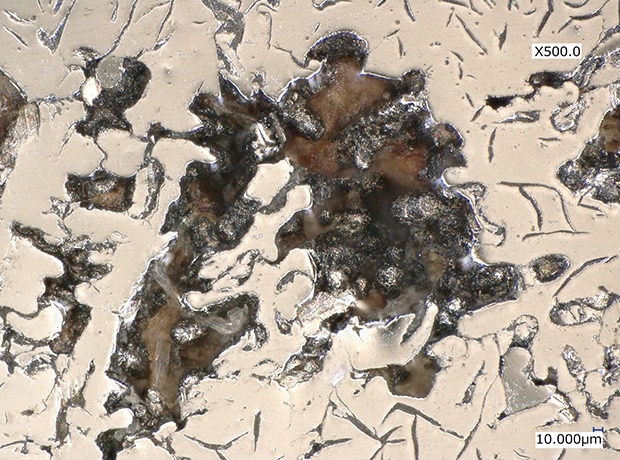
Cast hole in die-casting (500x)
High-magnification observation of a cast hole using the VHX Series 4K Digital Microscope
Handheld observation of a die-casting mold
Casting defects are not only caused by the temperature of molten metal and the pressure, but are also often caused by the state of the mold. In particular, defects such as rough cast surfaces are often caused by minute appearance defects inside molds, so mold inspection is indispensable as well.
However, because casting molds for automotive components are generally large, they cannot be cut out for observation and analysis using a microscope. In addition, non-destructive inspection using a conventional handheld microscope has the problem of insufficient resolution for minute cracks.
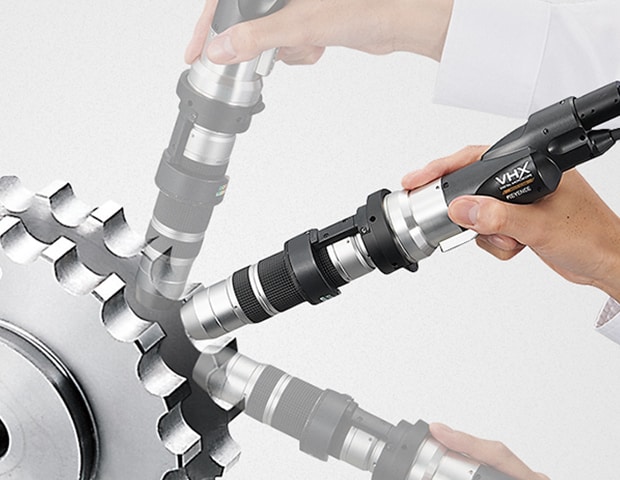
Example of handheld observation
With the VHX Series 4K Digital Microscope, you can perform magnified observation of minute cracks and other such defective areas on molds thanks to 4K images even while using a handheld lens.
3D shape and profile measurement of die-casting mold cracking
The VHX Series 4K Digital Microscope enables 3D shape display and profile measurement, enabling efficient and quantitative inspection.
3D shape and profile measurement of mold cracking using the VHX Series 4K Digital Microscope
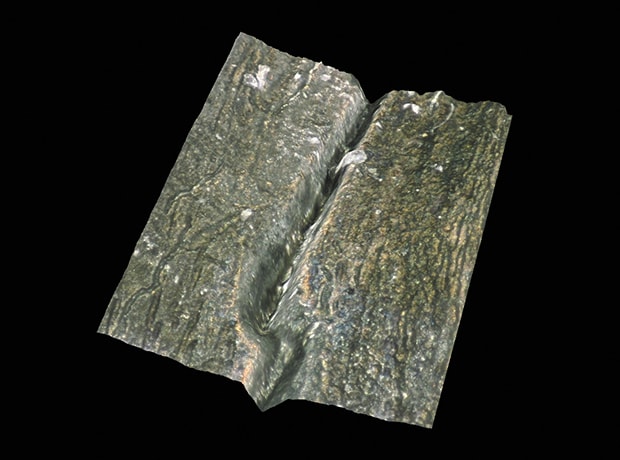
3D shape display of mold cracking (200x)
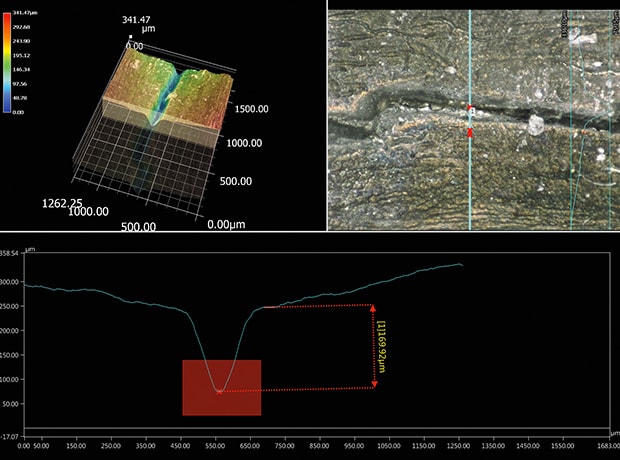
Profile measurement of cracking
Automatic area measurement and quantitative evaluation of a cast surface
The VHX Series 4K Digital Microscope also serves as a powerful tool for 2D inspection of 3D cast surfaces. The automatic area measurement and counting functions enable quantitative evaluation of defective areas on cast surfaces with simple operation.
You can use these functions to evaluate defects, such as rough surfaces, quantitatively. A single VHX unit enables observation, measurement, and reporting to be completed with a single device.
Automatic area measurement of a cast surface using the VHX Series 4K Digital Microscope
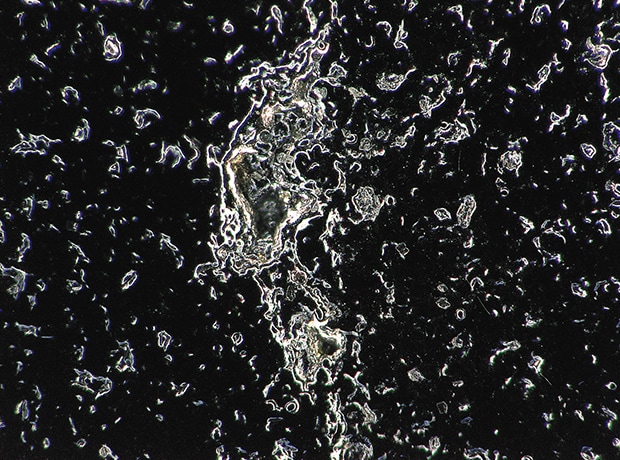
Cast surface (200x)
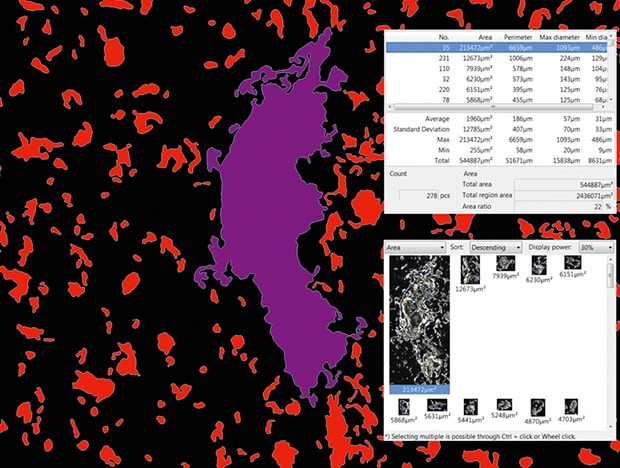
Automatic area measurement of a cast surface
We’re here to provide you with more details.
Reach out today!

A Single Microscope that Changes Die-Casting Manufacturing Sites
The VHX Series high-definition 4K Digital Microscope can support not only clear magnified observation using high-resolution 4K images, but also automatic measurement and 2D/3D measurement that are not possible with conventional microscopes.
The VHX Series can be used to quickly identify causes of defects and prevent their reoccurrence thanks to its functions that rapidly provide detailed images and numeric data of cast holes, rough cast surfaces, and other defects at die-casting sites. With these functions, a single VHX Series microscope works as an indispensable tool to improve quality and yield rates amid the expanding breadth of applications for die-cast products and their increasing functional requirements.
For additional product info or inquiries, click the buttons below.
Get detailed information on our products by downloading our catalog.
View Catalog